What IS a rigid heddle loom?

The rigid heddle loom has gained considerable popularity in recent years due to it's affordability, portability and versatility as a weaving loom.


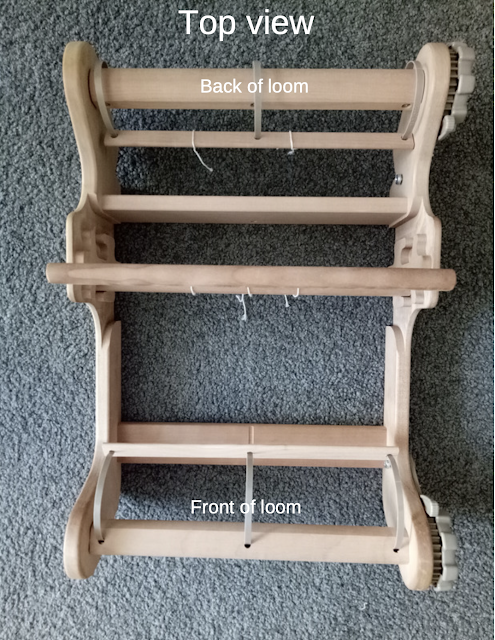
The rigid heddle loom is essentially a rectangular, wooden frame loom. However, it differs from the simple frame looms that are now readily available and often used for simple tapestry, as it has a space for a heddle/reed, making it capable of producing sheds (gaps or spaces) to weave through. It is a 2 shaft loom, but has further reaching capabilities, which I will explain further in a future post. I guess you could say that it is a crossover between a simple frame loom and a table/floor loom once you start looking at the specifics.


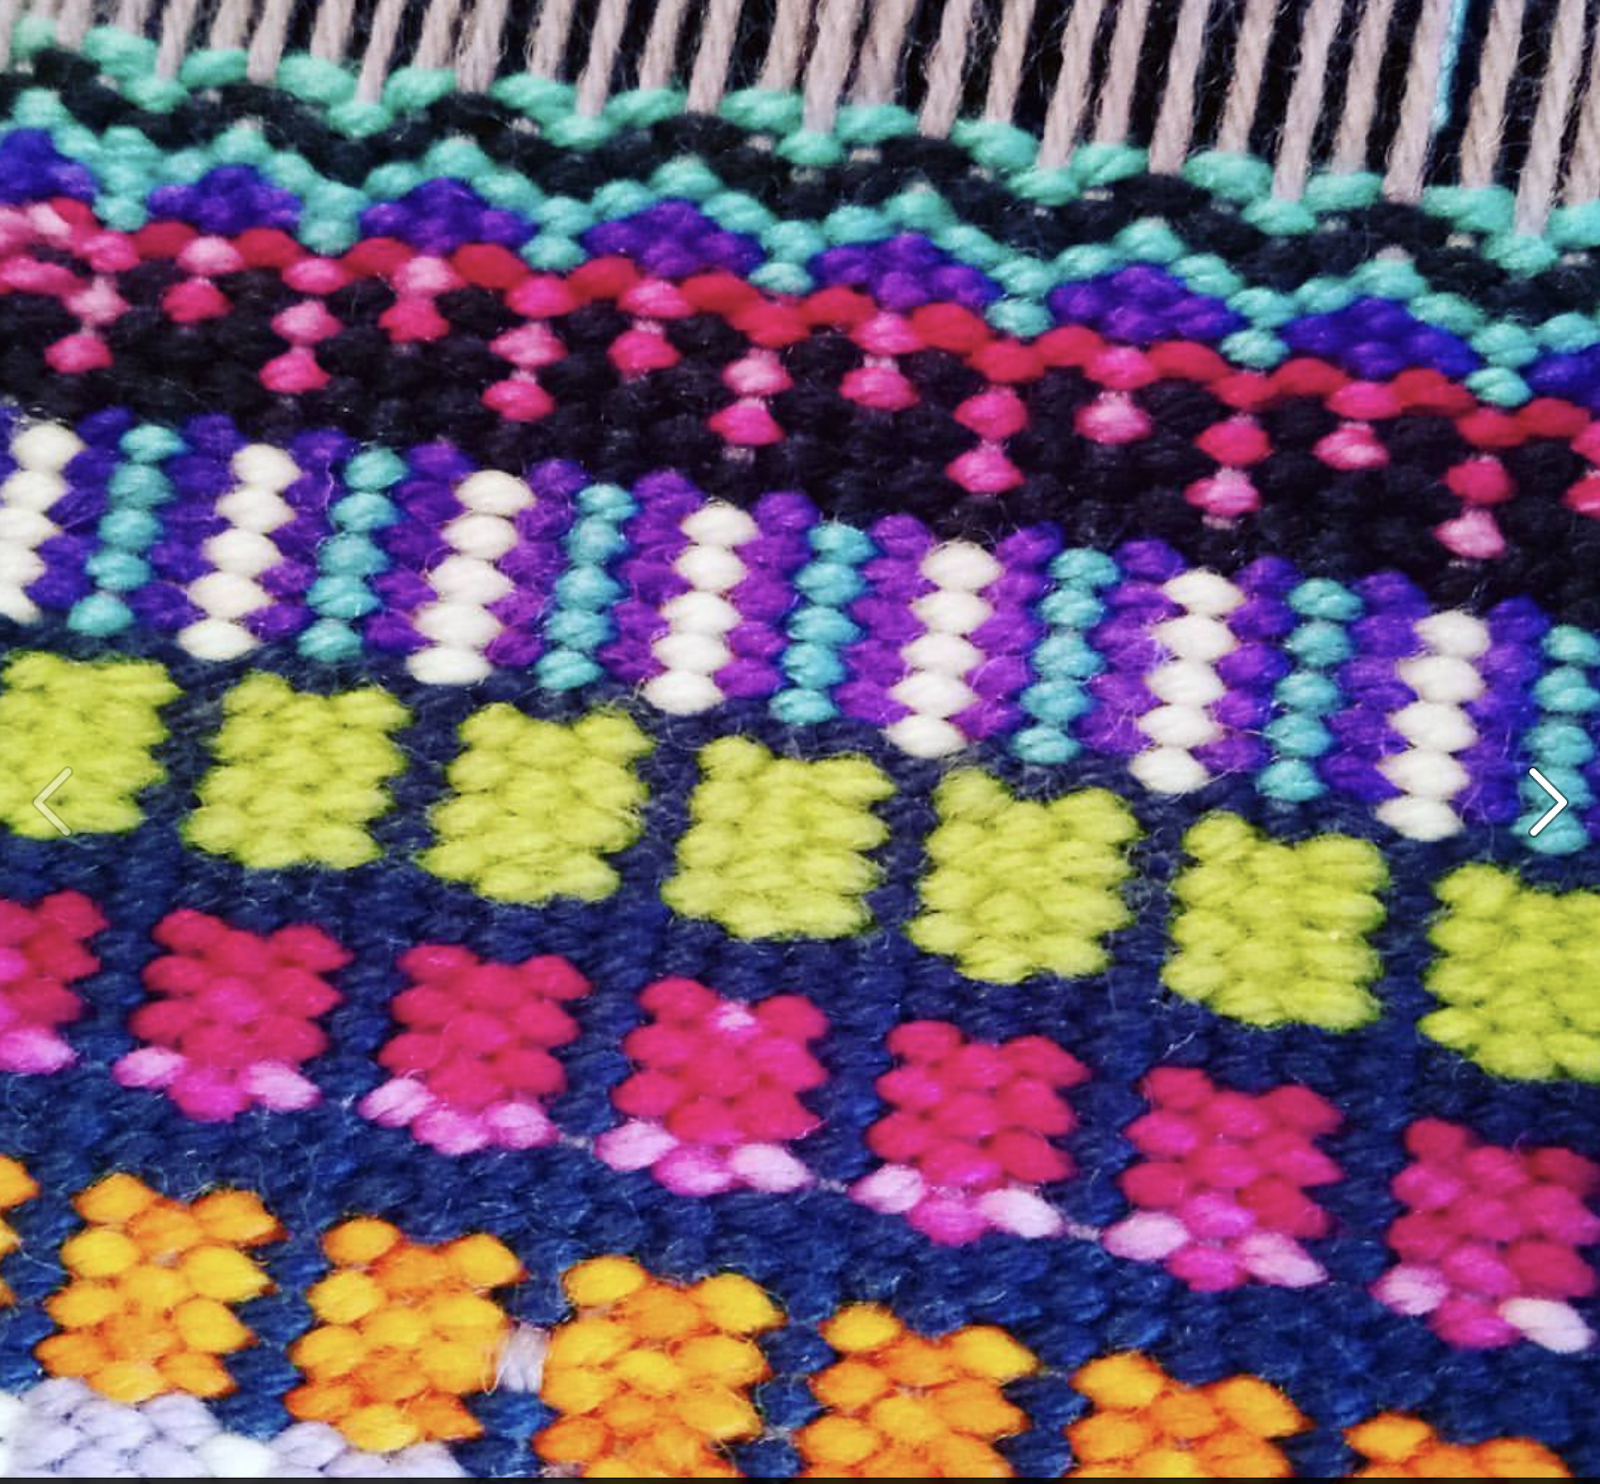
The "rigid heddle" that the loom gets it's name from is an ingenious device made from wood and often plastic nowadays. A single heddle/reed gives your loom holes and slots (these are what allow you to create the sheds) plus it doubles as a beater. The more of these heddles/reeds you use, the greater the possibility and range of sheds, and therefore patterns, become available. Another benefit of using 2 heddle/reeds at a time is the ability to weave double width cloth, which is ultra cool and can be seen in my Double Weave Baby Blanket class. Some rigid heddle looms now come with a built in double heddle block, which means it is easy to have 2 heddle/reeds positioned on your loom.
In it's most basic, 2 shaft form, you place the heddle/reed in either an up or down position, creating a different shed each time. Using these 2 sheds will give you plain weave.

This same heddle/reed will have a predetermined size or sett, which means that once you have established the sett for your project, you choose a heddle/reed that matches. As you thread the heddle/reed, the rigid plastic slots keep the threads at a certain spacing, and that is what makes your sett.


The RHL, similar to table/floor looms, has a front and back roller, meaning that you can put on a long warp and you advance the warp as you go so that the cloth will roll around the front beam as you weave. Some looms will have the option of buying an additional warp beam that attaches to the loom and allows you to put on extra long warps. It also has a tensioning system, which varies from loom to loom, but usually involves winding a pawl or a crank at the side of the loom to achieve good tension. 


In addition to your loom, you can purchase a stand, which, in my opinion is a really good option. I talk more about that in this video.

If you purchase a RHL new, it will come with everything you need to get started (except the yarn!)

I hope this has helped you to begin to wrap your head around what a rigid heddle loom is. Next time I'll be discussing what tools you need and how they work, so stayed tuned for that one!


There and back again

Well, it was a wonderful 3 weeks away, first in New Zealand, then in 2 different Australian coastal locations. I've never spent so much time away from home at once, and while I was glad to get back home, (to my looms!) it was a very adventurous and relaxing time. Getting away really helps to clear thoughts and look at things from a different angle too.


In the last week of our holiday, we had bucketing rain for 5 days. At first it was disappointing to not be able to get out to the beach and hiking as we normally would, but it ended up being a blessing in disguise. It forced us to just relax and enjoy the peace of the home and surrounding property. One of my favourite things each morning was to wake up and throw open the bedroom window. I would breathe in the fresh, clean air, observe the native birds and the sounds of a rooster crowing somewhere nearby. If I was lucky, I would spot a wallaby going about it's business. It's such a simple thing, to open a window early in the morning, but I don't do that here, in the suburbs, where throwing open the window exposes you to noise and unpleasant, odorous, unclean air.


So now we're home and back into the routine and the regular work. House work, homeschool, my husband's job, my weaving related work and everything in between. We continue to work hard and move towards our goals, hopes and dreams. We continue to hope that the property in the country that we dream of will become available, and that it will be within our budget. I will continue to grow this little business in hopes that it will help us achieve those dreams.

The ideas never stop flowing, so that is not a problem at all! I just completed a free Youtube class for my Moroccan Dream Scarf, which is a pattern I gift to new email subscribers. Next up is to begin the follow up to my Introduction to Floor Loom weaving class. I have been in the planning stages of this for a while and can't wait to get started filming. The class will include an optional sampler for those who need the extra practice, plus a project that I think you will love.


With Christmas fast approaching we are busy attending end of year parties, award ceremonies and concerts. It is a busy but very special time of year as everyone seems to be breathing a big sigh of relief and looking forward to some rest and family time (here in Australia we have 4 weeks of school holidays as it's Summer). My husband has to work over Christmas, as he works in the health care industry, but we will make the best of it and enjoy the time we do have together as a family. The children are anticipating the annual tradition of my gingerbread church, they love to see me bake and assemble it as much as they love to eat it. My husband often makes a traditional Scottish Clootie Dumpling, which is also a much anticipated feature of our family festivities. 


Years ago, I reached a point where I realised that I was completely caught up in the pre Christmas rush. I was stressed and trying to do too much. I made a conscious decision that from then on, Christmas was going to be quiet and relaxing. I would focus on Jesus, because without Him, there is no Christmas. The day of celebration is for Him, and what right do I have to be worldly and think it is all about me? Well, it worked. I accept that the lead up to the day is going to be more busy than usual, but it need not be stressful. Our Christmases are peaceful, restful and worshipful. 


It can be hard amongst all this activity to find the time to weave, so, as I'm always telling my students to do, I am making time to weave. Time waits for no man (or woman), so we creatives need to be clever and make the time work for us. Last night I got out my inkle loom and worked at the band that has been on there for way too long, so that it's now almost finished. Small, constant steps can give big results! I hope you're making time to weave and be your creative self too! 

You will be hearing from me again soon, so until then, Happy Weaving!


Tapestry weaving on a rigid heddle loom

Tapestry weaving is something I like to do just sometimes, when the mood takes me. Well, the mood did take me recently and I decided to follow one of my favourite themes that I haven't really explored yet - House on a hill, by the sea.

I wanted to do just small tapestries, as I planned on doing several variations on the one theme, and as a tapestry is a time investment, I thought the smaller, the better. I also have a soft spot for little things.

I warped my Sampleit loom with Ashford tapestry cotton, which is my go to tapestry warp. I used a 7.5 dent reed because that is the only size I have for the Sampleit, but a 10 - 12.5 dent reed would be preferable.

Each tapestry measures approximately 3.5" X 4".


 Tapestry 1 was woven with scraps from my stash bag. My very messy, tangly stash bag! It has smaller pieces or balls of all sorts of yarns from past projects, but mostly fingering to worsted weight.
Incorporated into this piece are pieces of wool, cotton, bamboo, silk, alpaca and some unidentified freebie from long ago.


For Tapestry 2 I was going for a "twilight" look, so I chose a limited colour palette of greens, blues, greys and muted colours.


Tapestry 3 was woven entirely with 8/2 size weaving thread in cotton and cottolin. I also chose a muted colour palette for this one.
It ended up being my favourite of the three, I like the look of the finer yarn and details. It took a good deal longer to weave due to the thin yarn, but it was so relaxing, I didn't mind at all!

I plan to do a couple more little tapestries on this warp, but they will have to wait until I have a bit more time.


*This is an affiliate link, which means that if you click this link and buy the book, I will receive a small commission. I only recommend books I have actually read and love.

A book that really helped me get started with tapestry is Tapestry Weaving by Kirsten Glasbrook. It is not a highly detailed book, which I think makes it great for beginners. She shows the basic techniques, gives projects for you to try and then later there are examples of her own work in a gallery. I have had this book for years and still refer back to it for information and inspiration.


I also have an Introduction to Tapestry online class, which is currently only available to members and is a great place to start out.

Also, in this Youtube video, I discuss why tapestry can be done on a rigid heddle loom, but why it's not entirely ideal. 

I hope you enjoyed this post, Happy Weaving!


Healthy lifestyle plus a recipe for you

If you follow me on social media you will already know that I've embarked on a healthier lifestyle. It has been just over 2 weeks and I feel like I'm adjusting - it was very hard initially! 

I'm not the sort who copes well with small changes - I'm more of an "all in" kinda girl, so it was important for me to make major changes.

Although I'd like to share my thoughts in more detail with you as I go along, for now I'll just show some examples of what I've been eating. It's actually been pretty easy to put together healthy meals for myself, even though this seemed daunting at first. I thought it would be too difficult and too expensive to not always eat what the family was eating. It turns out that this was just one of many excuses I'd been storing up in my head!

I have lost a little weight, which has been encouraging.

So, here is a snapshot of what my healthy eating has been looking like. Most of these are pretty simple, throw together, low cook dishes without a real recipe. Just how I like it.


Lets start with sweets. (Also just how I like it!) Chia vanilla pudding with peanut butter banana. It looks sloppy and not all that appetising but as an afternoon snack, it is THE BOMB!


I can't take credit for the delicious Quinoa and corn salad, my husband made that (he is an awesome cook). Thrown together with some chopped raw zucchini and tomato and voila! Lunch!


Baby spinach and chickpea salad with lemon and yoghurt dressing. Another light and easy lunch.


There is a bed of brown rice under the tomato, spinach leaves, red salmon and walnuts. Topped with low fat yoghurt and low fat mayonnaise. 


Salmon and salad pita wrap.


Half a chicken breast, drizzled with sesame oil, seasoned and baked in foil in the oven and served with a bulgur wheat, tomato and cucumber salad. Squeeze of lemon juice and done.

OK, here comes the recipe, because, if you're like me, one of your biggest challenges is your sweeter than sweet tooth.

Lets call them my

Rustic Banana Biscuits

Ingredients:

2 cups rolled oats, blitzed in a food processor
2/3 of a cup of rolled oats extra
2 large, very ripe bananas
1 small egg
1 tablespoon peanut butter
50grams dark chocolate, chopped into chunks


Preheat oven to 180 degrees celsius (350 F). Blitz your 2 cups of rolled oats in the food processor until fairly smooth.


Mash your bananas, stir in the peanut butter. Whisk in egg with a fork. Add both batches of oats and mix well. Add the chocolate, mixing all ingredients together.


Place scant dessertspoon full of mixture in blobs on a tray lined with baking paper. Press tops lightly with a fork.


Bake for 12 minutes or until browning. Cool on a baking rack.


Perfect for a healthy afternoon snack with a hot cup of tea.

Bon appetit!

I have made a Facebook group so that I have a place to share information and support others (as well as get some much needed support myself!) Please join if you would like to be involved! 

Did you like this post? Would you like me to share more of my healthy journey? Let me know by leaving a comment, I'd love to hear your thoughts!


New Krokbragd Bag Class!


My brand new class is finished and available! When designing this bag, my plan was bold colour and design. I think I can safely say that I achieved that!


I used a contrast of deep, navy blue and a middle panel of bright colours and bold patterning to really set off the feature panel.


Originally I had a totally different design, but when I started weaving, found that it was a little more drab on the loom than it had been in my head. So, I whipped out the Sampleit, threw on a short warp and started experimenting with the colour palette I had chosen for the bag.


I was much happier with what I came up with on the small loom and although not all of this design made it into the bag class, I'm really happy with the finished bag - plus I have plenty of other designs up my sleeve for another time.


The idea for the bag actually came to my last year, when I was playing around with this sample below. It's not until recently that I actually got around to making the class.


The project uses two heddles and provides two different methods for threading, according to your preference. Full sewing and finishing instructions are also included in the class.

The bag pairs perfectly with my Krokbragd Mug Rug Weave Along that ran recently, so definitely start with the mug rugs if you're hesitant about giving this a go.

And, if you just want to find out more about Krokbragd, I have written this post which gives you more information, plus links to my Youtube videos on the topic.

I hope you can join me for this one, Krokbragd is so much fun, so rewarding and for me, is a weave with a total WOW factor!


Great rigid heddle weaving books!

My last post detailed some of my favourite books for 4 shafts or more, but today I'd like to talk about some great rigid heddle books.
I already have a video on this topic, but I know some people prefer to read rather than watch, plus I've added some extra books to the original list, so here we go!


*this post contains affiliate links. This means that if you click on the book link provided and purchase the book, I will receive a small commission.

I'll start with my favourite and most used book, in fact, this is the first rigid heddle weaving book I bought.

The Weaver's Idea Book by Jane Patrick This book has so much content and is great for beginners. It allows you to start with the basics and build as you go. Just about everything you need to know initially is contained within these pages and I think of it a little like a training ground for new weavers. It is also hardcover with spiral binding, making it easy to lay flat and view while you're weaving. Highly recommended!

Weaving made Easy by Liz Gipson. A lovely little book that includes information on loom set up. The projects are simple enough for beginners and interesting enough for all weavers.

Woven to Wear by Marilyn Murphy. I also read this book as a newer weaver and loved how it stirred my imagination. It contains simple garments with lots of plain weave, making it great for beginners, particularly those wanting to get a taste for sewing with your handwoven. The sewing projects are simple rather than finicky, with the use of large shapes instead of small pieces.

Inventive Weaving on a Little Loom by Syne Mitchell This book is awesome value for beginners to intermediate with lots of ideas. For the newer weaver, there is practical information and plenty of inspiration for once you have the basics down. I think of this book as one that you may not fully appreciate until you have some more weaving experience, perhaps a book that will grow with you through your weaving journey. Towards the middle and later part of the book are projects and ideas that may be too challenging for a new weaver, but that an enthusiastic and curious weaver will definitely want to make use of later on. There is a lot of information, it is attractively set out and a joy to flip through.

Weave, Knit, Wear by Judith Shangold  This book is responsible for opening my eyes and quickening my heart over the range of possibilities with a rigid heddle loom and garment making. Judith uses mostly plain weave, colour and design to make fabric look special. She includes design layouts and illustrations to help you wrap your head around how garments can be constructed. What I really love about this book is the fusion of weaving, knitting and crochet added in. It really has encouraged me to think outside the square and maximise my rigid heddle loom.

Simple Woven Garments by Sara Goldberg Another really great book on making simple garments with simple, colourful, hand woven cloth. There are more than 20 projects and they are all wearable! There are also details on adjusting garments to your own specifications.

I hope you enjoyed my list and until next time...

Happy Weaving!

My Favourite Books for Multi Shaft Weaving

I love books, so it makes sense that I am a huge lover of good weaving books. It can be hard to know which books are worth buying, especially if you're buying online and can't view the book before purchase.

I have already made a video on my favourite rigid heddle weaving books, but haven't talked about my floor loom or multi shaft books.

This is certainly not an exhaustive list, and I definitely plan on increasing my collection over the years, but these are a few that I have found particularly good.

*Disclaimer* This post contains some affiliate links, which means if you click on a link I've provided and purchase a book, I get a small commission from The Book Depository. These are all books that I owned and loved before becoming an affiliate, and I would not recommend a book I did not own and use.

I will start with my absolute favourite. If, in some terrible circumstance, I had to choose just one of the following books to keep, this one would be it!


The Handweaver's Pattern Directory by Anne Dixon only covers 4 shaft weaves, and yet, with the number of pattern drafts you could feasibly use this book for years before even considering buying an 8 shaft book. There is nothing I do not love about this book! Yes, it is a little expensive, but I consider  it my "go to" for any 4 shaft weaving. It's a hardcover book with spiral binding. This is awesome because you can lay the book flat to follow a threading or treadling pattern, and the hard cover prevents any damage to the pages. I've had mine for many years and it still looks as good as new. The layout shows you exactly what you can expect from each draft by providing colour pictures and yarns used to achieve each one - great for those just starting out.


Once again, not a cheap book, but this one is an absolute classic!  Carol Strickler's A Weaver's Book of 8 Shaft Patterns has plenty of information on 8 shaft weaves, explanations of tie ups and treadlings, and black and white pictoral representations of each weave (there are almost 900 photos). Individual yarn suggestions are not given, but in each new chapter, suggestions are made for particular weave structures. Many of the drafts have historical information - where the draft came from (if known) or where it is adapted from, which provides the keen weaver the opportunity for further research if desired. 


Next Steps in Weaving by Patty Graver has been a great one to add to my library. Published in 2015, it has a more modern and fresh feel. The layout is uncluttered but still contains a lot of information. I admit that I read this book when it first came out and I was in the infancy of my multi shaft journey. I felt like some of it was a bit beyond me at the time. However, when I cam back to it later (after a lot of research and practice) I found that the language now made sense and it was in fact a very helpful book! 
The beginning of the book goes over understanding terminology and drafts (something that many new weavers struggle with!) She explains twills and twill orders and then launches straight into the projects. This is my style of learning and teaching - project based! To get stuck in and actually learn something as you do it, rather than be stuck at the starting line with a lot of theory and fear of how to put it into practice. Patty starts with some basic twill projects, then shows more advanced versions to expose the reader to what is possible with variations and colour. The threading charts for the projects are all colour coded, which I think is a really great visual learning cue for newer weavers, and even for more seasoned weavers who just want to follow a threading chart in a simple format.
There is a lot more I could say about this book, but then this post may turn into a book itself! So, I'll finish up with this. It's a great book, the projects and samples are beautiful and inspiring, and even if, like me, you find it a little overwhelming to begin with, it is a book you can keep going back to over and over.


A Handweaver's Pattern Book by Marguerite P Davison is another well know weaver's classic. It was first published in 1944 as a green book, the orange one being a more recent and updated publication. I have heard that the original green book was better, but being out of print for some time, is as rare as hen's teeth. This book has 200 pattern drafts and has 4, 6 and 8 shaft weaves. The layout is a little more old fashioned (though there are black and white photo representations of most drafts) and some may find it difficult to decipher the way in which the drafts are drawn. That should not put off the adventurous weaver though, as it is very beneficial to be able to read all styles of drafts so that you can decipher them, no matter what country or time period they are from.


This is one of those books that you read and just think, "that is a lovely little book". Simple, lovely big photos, nice colour. Tom Knisely's Handwoven Baby Blankets starts out with a useful section on the basics of baby blanket weaving, such as sizes, colours and materials. 
There are over 30 projects and it includes both 4 and 8 shaft. Every project has specific yarn and colour descriptions. If you're interested in weaving baby blankets, I highly recommend this delightful book!


Probably my most asked question from multi shaft weavers is "how do I read a draft?" The next step on from understanding how to read and use a weaving draft is to begin drafting them yourself. This is something that is of huge interest to me, but something I have not devoted enough time to as yet and still have much to learn. If you are interested in drafting for yourself, Madelyn van der Hoogt's The Complete Book of Drafting for Handweavers is going to help a lot! While I confess that I have not made my way through the entirety of the book yet (it is in a workbook style with drafting exercises for you to follow), I intend to do so as it contains such valuable information. This book is only available from a couple of sources. I bought it directly from The Weaver's School (shipping to Australia is such a killer!!) and you can also buy it from The Woolery. 

I do have more weaving books in my collection, but these books I've listed and described are the ones that I am most happy to recommend and really feel that they would benefit your weaving library too. I hope you have found this post helpful, please let me know if you have any questions!


Where it all started (long post!)

My 3 year Youtube channel anniversary came and went without my noticing back in August. I was looking through my list of 159 (!!) videos tonight and noted the date of my first video, way back in 2015.

While these years have flown so fast and so much has happened since I hesitatingly uploaded that first video, I thought it a good time to reflect and share a bit more of my journey with you, particularly if you have only found me recently.

Some of you have been with me almost since that first video, and I believe that I have most to thank you for. It is the first viewers who encouraged me to make more videos, who threw amazing compliments in my direction, and who have shown me so much love these past 3 years.

So, lets go way back to the beginning. Before weaving, I had many, many crafts under my belt. One of them was knitting, which I used to indulge in a great deal until a painful shoulder Repetitive Strain Injury reared it's ugly head and left me just a "sometimes knitter". Anyway, I had learned an immense amount of helpful knitting techniques from kind people on Youtube. When I had been weaving for some time and was really excited about what I was doing and learning (still am!) I had the idea of contributing to the Youtube craft community by sharing a little of what I knew. I borrowed my son's little camcorder, and, with pretty poor visual and even worse audio, I recorded this Waffle Weave on a rigid heddle loom video.


I didn't expect that many people would watch it, and that was fine by me, I just wanted to share with anyone who may be interested. It wasn't long before I started getting comments and very positive feedback. People were asking me to make more videos and I couldn't believe it. Me? Introverted, dull as dishwater housewife me? I was pretty astounded at the response!

I made some more videos and I discovered something about myself. I loved teaching! I had taught my kids at home for a long time (my oldest homeschooler is now 18!), but this was teaching adults something I was really passionate about and I wanted to keep doing that!

As I made the videos, the cost of materials started adding up and I had no job or real income at this time. Youtube had a "paid channels" feature and so, I started one. I charged roughly $2 per person, per month and this enabled me to keep going because people joined and paid. 

In my "spare time" I started putting together some weaving designs to sell in my Etsy shop. I now have 10 designs, and once again, I've been amazed at the response. I also love designing and look forward to continuing doing that. 

Back to Youtube, where it was abruptly announced that the paid channel platform was closing. This left me with a quandary - should I try to find another platform or is this a sign that I should close down. Well, my students came to my rescue and begged me to continue. A short time later, I found a great hosting platform - Teachable and have been with them ever since. Youtube closing the paid channels was a HUGE blessing in so many ways and has allowed to go forward in ways I could not have imagined. If you haven't seen my Online Weaving School, please check it out to see what I'm talking about! 

I now have 40 classes available, including my first floor loom course. Being on a professional platform has challenged me to do better and construct my classes to give students an optimal learning experience. I must be doing something right, because the school continues to grow and I continue to get awesome feedback. Some months I now earn a full time income, which is a dream come true.

All of this has been made possible because people like you support me in so many ways. You support me with your enthusiasm for weaving and learning. You support me financially, which allows me to continue to grow this little business. You support me on a personal level with your kind messages and many prayers over the years. 

A topic that is often discussed in business circles is "success". Success to many, seems to be when you reach 6 figures, as though there is some magic monetary value that means you have made it. Well, if success comes down to 6 figures, I'll leave it, thanks all the same. Am I successful? Yes! Do I earn 6 figures? No, and probably never will. I earn a living (maybe not a lavish one by the opinion of many, but it helps to feed and clothe my family!), I get to do what I absolutely love, and I'm surrounded by wonderful, supportive people. 
Am I successful? Heck, yeah!

I want to thank you all for making this happen. I had no idea that I was capable of running a business that began with a hobby and a passion. My hope is that I can continue to do this for the rest of my life, and with all the plans and ideas I have for my online school for the future, I shouldn't have too much trouble achieving that goal!

God has blessed me abundantly through this venture, I pray He blesses you too!


5 Steps to Successful Weaving!

It is my belief that anyone can be successful in weaving. The following steps are my essentials to becoming a successful weaver.


This post contains an affiliate link. I only recommend products I use and love.

1. Basics first.
Start out simple. Acknowledge that, as a beginner, leaping into a difficult project straight away is probably not the best way for you to get started. If you do, you may end up feeling discouraged and that you're "no good at weaving". When learning something new, it is rare for anyone to jump into an advanced level, you need to take the baby steps, then walk, then run!


2. Patience.
You see the images from weavers on Pinterest and Instagram. They look so fabulous that they inspire you to try weaving for yourself. That is natural, that is how I started. But to get to the point of being able to weave anything like the beautiful images, it may take quite some time, and it may not be easy. Mistakes are an important part of the learning process. Know that you will improve, if you practice and give it time.


3. Persistence.
Would you believe me if I told you that I have almost given up on weaving a number of times? There were times that I was so frustrated and had no one to help, that I thought surely I must be just too stupid to learn this, or that I felt I was wasting my time. I'm so glad I never did give in though! Imagine where I would be now - a beginner level weaver with too much equipment gathering dust, and a feeling that I had failed. Keep going. Get stuck? Go back to the basics. Find help. Buy that new book you need, some online classes, or find people in your area with similar interests. There is a way. You can do it!


4. Resources.
I could say that I am a self taught weaver, but realistically that is not really true. I have learned this craft through reading many books, studying articles, drafts and discussions online, and by taking online classes. When I got my first loom, I had no idea where to start. I didn't know any weavers. I was too busy caring for my family to be able to attend a guild. So, I found the right resources that helped me get going. As I improved, I found more resources to help me level up. Resources are out there - lots of them, you just need to find the right ones for you. 


5. Community.
Funny for an introvert like myself to have "community" as one of the keys to success. I'm the type who avoids social settings wherever possible and hates the idea of group meetings or activities. Like many other typical introverts, social occasions are physically draining and just mostly not enjoyable. However, that doesn't mean that I hide in a hole and don't see or speak to anyone! 
I never would have realised the importance of community until I started weaving. My community is online and I am so grateful for it. I have daily contact with hundreds, if not thousands of weavers across the globe and of all different levels of ability. We teach and learn through one another, share information and discoveries, and most importantly, we inspire one another. It's a beautiful thing to have the support of others who are just as passionate about weaving as you are. 
So, whether you love real life interaction or virtual interaction, find the people who are going to help you succeed in weaving!


I hope this article was helpful to you! Perhaps you are looking for some new resources? Here are a few to get you started:

My Youtube Channel

My Online Weaving School

My Weaving Lessons Facebook Group


What is Clasped Weft?

Just when you think you've tried everything in weaving, you come across something different, like Clasped Weft. The title pretty much summarises the particulars, but to break it down, the clasped weft technique uses 2,3 or 4 interlocking weft colours. If you have done any tapestry, you will be familiar with the interlocking concept.


We mainly use a plain weave structure (though clasped weft can actually be used in other structures, such as twill). It is a perfect technique for a rigid heddle loom, because, although it's simple, it looks special and has big impact.

Lets look at some (rather poorly drawn, sorry about that!) diagrams to get a clearer idea of how this works. The drawings are over simplified, as I haven't drawn in the warp and weft interlacement, but I have drawn in the edge warp threads:

Clasped weft with 2 weft colours.


Clasped weft with 3 colours.


Clasped weft with 4 colours.


A few recommendations for better results.
1. Use contrasting colours. Light and dark will make the weaving pop.

2. Use the same weight yarn for both warp and weft. You will get better results and avoid the not so pretty lumps and bumps that can occur at interlocking points.

3. For the 2 colour technique, a variegated yarn with a contrasting yarn looks really cool! (See photo below).


If you like the look of clasped weft as much as I do, I have some great news for you! I have 3 free Youtube video tutorials that will teach you each of these techniques. Start with video 1 so that you can practice the technique, before moving on to the others. 


Try it out and let me know what you think. Leave me a comment here or under any of the Youtube videos, I love to hear from you!


Weave Along Round Up

The Krokbragd Mug Rug Weave Along (try saying that with a mouthful of cake!) has been a great success! While many students are still working on their mug rugs and some have yet to start, I have been seeing so many wonderful photos of their work, that I couldn't wait to share.

What I really love is the variety of mug rugs I'm seeing and the range of interpretations of my original design.


Charlotte, who has been with me a long time, and is a very prolific weaver, came up with several variations on the original design. She even figured out how to weave sheep and then shared the draft with the other students, several of whom were inspired to weave their own sheep!


Mary went with some darker colours and white highlights. So lovely!


This is one of Kelly's (a different Kelly!) interpretations. I love that she included many different colours, but that they all work together so harmoniously.


And another, different rug from Kelly. You can see Charlotte's sheep and my tulips (from this Youtube tutorial).


And finally, these beauties from Connie. So lovely!


Robyn decided on a bold and traditional design for this mug rug. Love the colours!

Perhaps you're looking at all these gorgeous mug rugs and wishing you had joined in? No problem, you still can! 
All the details are here.

Thanks to everyone who joined in and threw themselves into the challenge with such gusto, it has been so exciting for me to see.

This weave along leads beautifully into the next class, which will be a krokbragd bag with two heddles. I'm working on that right now, it should be ready in a couple of weeks.

Until next time....

Happy Weaving!


This blog is closing!

All posts will now be found at my new site.  Click here to go the the new site.