Showing posts with label rigid heddle weaving. Show all posts

Weaving kitchen cloths

Kitchen cloths were one of the first weaving projects I ever attempted. They are really perfect for beginner weavers, as at their most simple they can be just a square of plain weave. And, at the end, the weaver has a beautiful and functional woven piece.

*Please note, this post contains affiliate links. 


If the weaver wants something a little more challenging, adding pick up sticks adds interest to the weave and functionality to the cloth, making the cloth not only very attractive but more absorbent with the added texture.


I am often asked the question "Which yarn is best for kitchen cloths?" 

In my opinion, thick cotton is the absolute best fibre for kitchen cloths. It is soft, absorbent, easy to wash and care for, unlikely to harbour bacteria if treated properly and yarns come in many different colours.


My favourite cotton to use for my cloths is from a mill not too far from me. It is a gorgeous cotton, so it makes sense for me to buy and excellent Australian owned and locally produced product.


But, what about those of you who can't access this yarn due to location? Well, there are plenty of alternatives! 


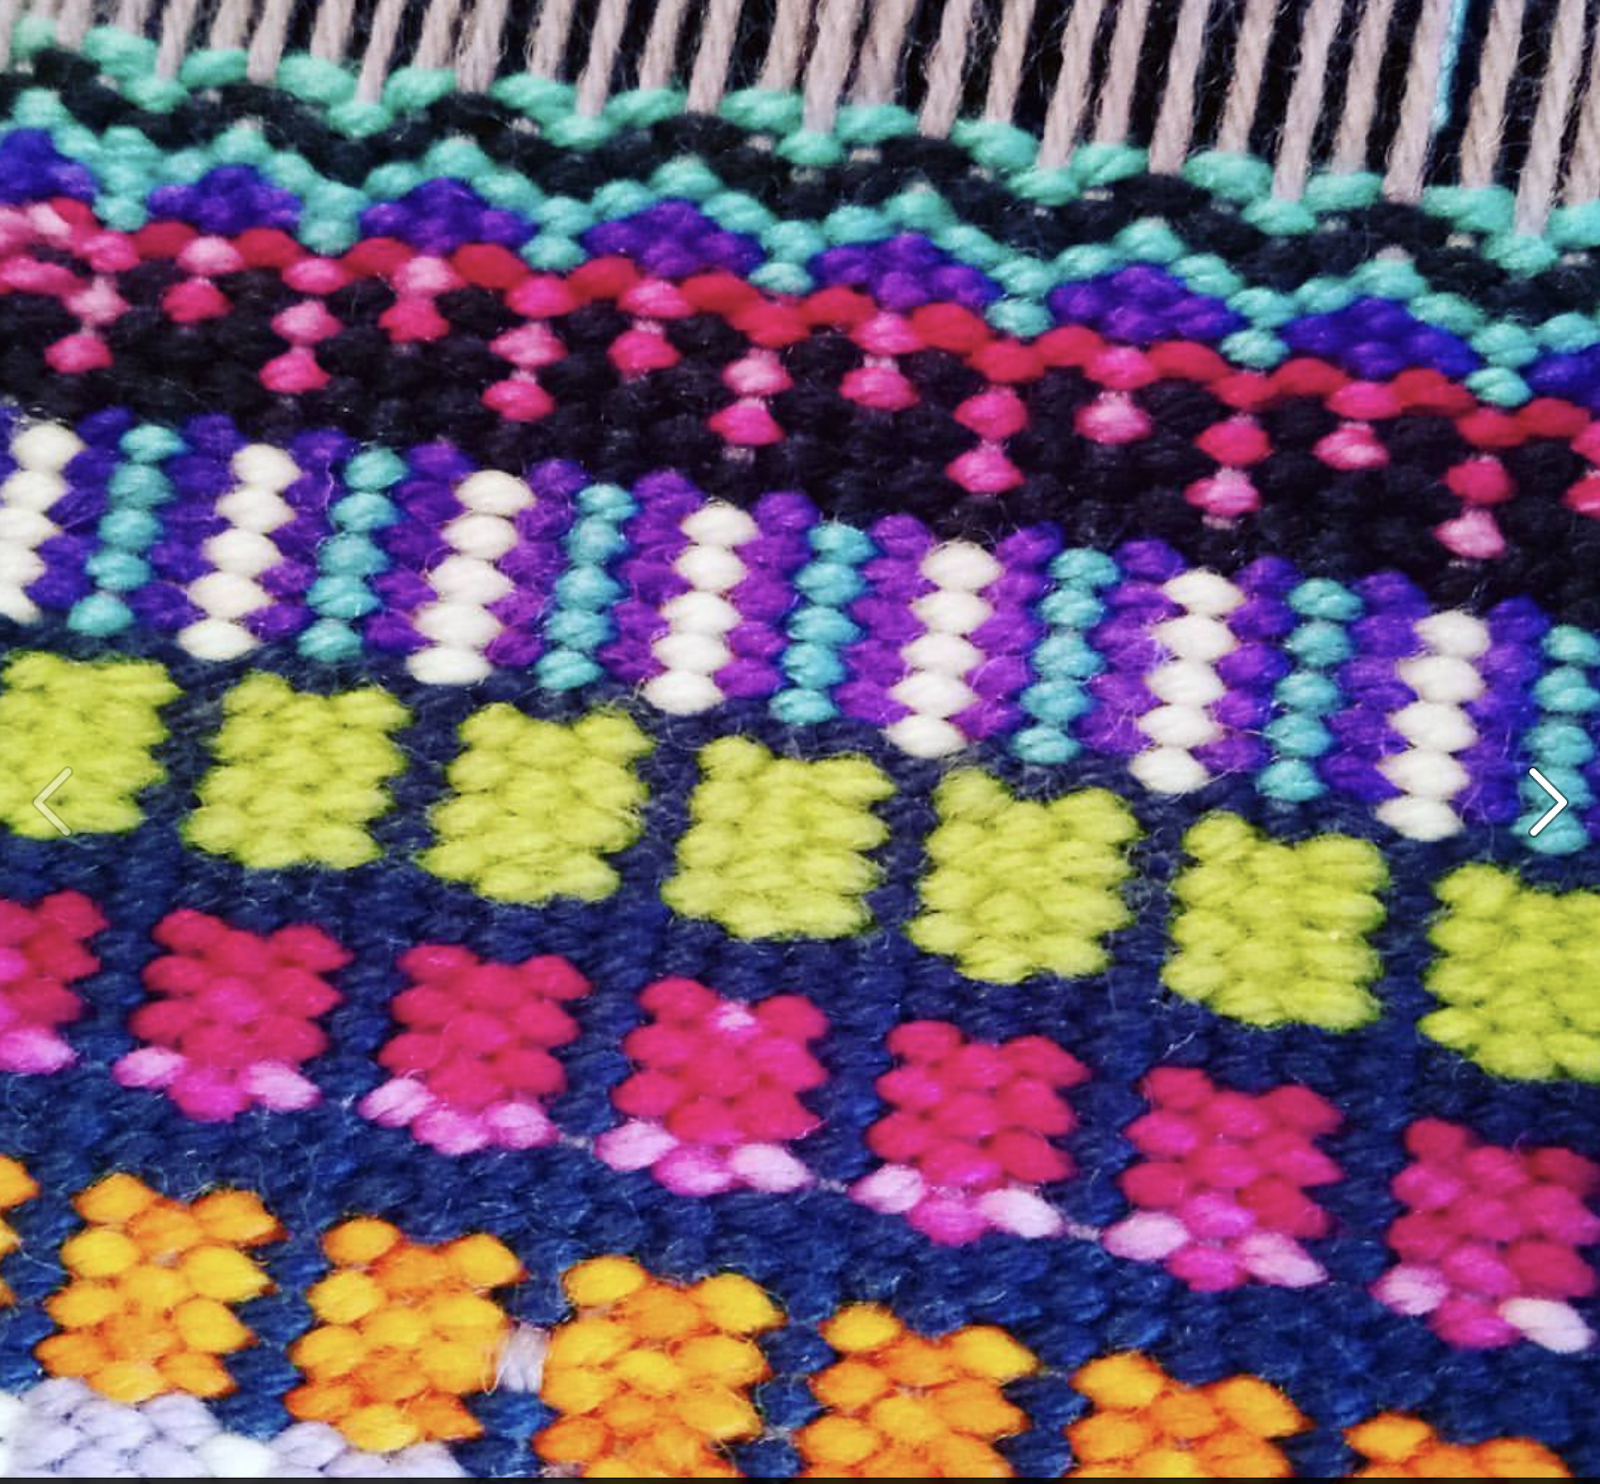
A very popular cotton is the American made Sugar n Cream. It is just the right weight for kitchen cloths, is affordable and comes in many bright and variegated colours.

There are some beautiful organic cottons out there too, such as Babytoly, which comes in natural as well as bright, happy colours.

I have also successfully used a bamboo cotton blend for cloths. The end result is a little different, the cloth is heavier when wet and does not tend to wear as well over time. Still, it make a beautiful, soft and absorbent cloth. If you're interested in trying a blend, something like this Lion Brand Blend, which is 50% bamboo and 50% cotton would work well.


I have also had fun buying white or natural cotton to dye in variegated colours, using fibre reactive dyes. You can either use the variegated as warp and a solid, contrasting colour as weft or vice versa - both give wonderful results.


My kitchen will always have handmade cloths now, I can't go back to the disposable cloths I once used!

If you would like to have a go at weaving some yourself, I can help with that!

My Etsy shop has a step by step downloadable pattern "Textured Kitchen Cloths" for rigid heddle loom that you can find here.
Or if visual learning is more your style, you may wish to take this class instead.

My Textured Cloths pattern only needs a small loom to weave, the Sampleit is perfect for this project.

I should also mention my Waffle Weave tutorial on Youtube, which gives great texture for kitchen cloths.

I hope that you will experience the joy of weaving and using your very own kitchen cloths.

Until next time...

Happy Weaving!

What can I DO on a rigid heddle loom?

Perhaps a better question might be "What can't I do on a rigid heddle loom?". Yes, it's that versatile!

I already mentioned in the previous post that you can create more complex patterns by using multiple heddles/reeds. For example, if I want to weave a 4 shaft pattern, I can use 3 heddles/reeds to achieve that, as demonstrated in my Three Heddle Adventures class. Or, if I want to use 2 heddles I can also weave some really awesome patterns, as demonstrated in my Weaving with Two Heddles class. However, many rigid heddle weavers also achieve more complex patterns by using pick up sticks to manipulate threads that are threaded in the slots of the heddle/reed. You could think of these threads as "uncommitted", (not threaded in a hole) so free to play around with. One of the more impressive examples of complex patterns with pick up sticks is Jeen's Pinwheels, which is actually an 8 shaft pattern! You can see another great example of that on FarmNana.


My Midnight Shawl pattern uses 2 heddles/reeds to achieve a diamond pattern.

Another great boon to rigid heddle weavers is the use of Colour and Weave techniques. To break it down to a simple form, you arrange your warp and weft colours in such a way that, even though you're usually working plain weave, it can look like an impressive and complicated pattern.


My Log Cabin Table Runner is a good example of the use of Colour and Weave.


My newest Youtube video shows you what you can do by thinking outside the box. I show you how to make a wavy and a zigzag shuttle from cardboard, so fun!


Did you know that you can use your rigid heddle loom for tapestry too? You can read more about that in this post. I also share my tapestry thoughts in this video.


There are many possibilities with tapestry on the rigid heddle loom! This video series outlines the use of freestyle tapestry.


Krokbragd is one of my favourite weave structures, and is easily achievable on a rigid heddle loom. I have written about it, and have many videos on Youtube, as well as a few online classes. I just love it!

I could really go on and on because there is so much more you can do with this humble loom. Hopefully what I've written here has convinced you of the capabilities of rigid heddle weaving and given you some more material to look into.

Until next time...

Happy Weaving!


What tools do I need for rigid heddle weaving?

When you buy a rigid heddle loom, it should come with a few standard tools, which usually include:

*A heddle/reed (usually 7.5 or 8 dent)
* A warping peg and clamp for direct warping
* A clamp for holding the loom to a table while warping
* A stick shuttle
* It may include a threading and reed hook
* Cardboard warp separators (may not come with all looms)
** Some looms now come with a double heddle block built in


Apart from the standard tools, there are extra things that are either essential or come in handy.

Other essentials:

*Scissors - sharp scissors will save you a lot of frustration
*Tape measure
*Warp separators (if not received with your loom)
*Yarn
*Inch ruler (for figuring out the sett of your yarn)
*Project journal for recording all your project information
*A big mug of tea (or is that just me?!)


                                    Handy optional extras:

*Tapestry needle
*Extra heddles
*Fringe twister
*Sewing machine 
*Serger
*Loom stand
*Tapestry beater, comb or household fork
* "S" hooks or other weights
*Calculator
*Instructional books (the  Book Depository (affiliate linkhas a huge range of great weaving books and this post will help you to determine which book/s might be right for you).
*Online lessons are an awesome tool to get started. You can check out my Youtube channel and my Online Weaving School for further help. 

This post is a companion post to this Youtube video, so pop over and watch if you want to see the tools and hear my explanations.

Something to remember when you're just starting out with rigid heddle weaving is that you don't need All.The.Things right away! The tools that come with a newly purchased loom are sufficient to get you started, and you can gradually build from there.

What IS a rigid heddle loom?

The rigid heddle loom has gained considerable popularity in recent years due to it's affordability, portability and versatility as a weaving loom.


The rigid heddle loom is essentially a rectangular, wooden frame loom. However, it differs from the simple frame looms that are now readily available and often used for simple tapestry, as it has a space for a heddle/reed, making it capable of producing sheds (gaps or spaces) to weave through. It is a 2 shaft loom, but has further reaching capabilities, which I will explain further in a future post. I guess you could say that it is a crossover between a simple frame loom and a table/floor loom once you start looking at the specifics.


The "rigid heddle" that the loom gets it's name from is an ingenious device made from wood and often plastic nowadays. A single heddle/reed gives your loom holes and slots (these are what allow you to create the sheds) plus it doubles as a beater. The more of these heddles/reeds you use, the greater the possibility and range of sheds, and therefore patterns, become available. Another benefit of using 2 heddle/reeds at a time is the ability to weave double width cloth, which is ultra cool and can be seen in my Double Weave Baby Blanket class. Some rigid heddle looms now come with a built in double heddle block, which means it is easy to have 2 heddle/reeds positioned on your loom.
In it's most basic, 2 shaft form, you place the heddle/reed in either an up or down position, creating a different shed each time. Using these 2 sheds will give you plain weave.

This same heddle/reed will have a predetermined size or sett, which means that once you have established the sett for your project, you choose a heddle/reed that matches. As you thread the heddle/reed, the rigid plastic slots keep the threads at a certain spacing, and that is what makes your sett.


The RHL, similar to table/floor looms, has a front and back roller, meaning that you can put on a long warp and you advance the warp as you go so that the cloth will roll around the front beam as you weave. Some looms will have the option of buying an additional warp beam that attaches to the loom and allows you to put on extra long warps. It also has a tensioning system, which varies from loom to loom, but usually involves winding a pawl or a crank at the side of the loom to achieve good tension. 


In addition to your loom, you can purchase a stand, which, in my opinion is a really good option. I talk more about that in this video.

If you purchase a RHL new, it will come with everything you need to get started (except the yarn!)

I hope this has helped you to begin to wrap your head around what a rigid heddle loom is. Next time I'll be discussing what tools you need and how they work, so stayed tuned for that one!


Tapestry weaving on a rigid heddle loom

Tapestry weaving is something I like to do just sometimes, when the mood takes me. Well, the mood did take me recently and I decided to follow one of my favourite themes that I haven't really explored yet - House on a hill, by the sea.

I wanted to do just small tapestries, as I planned on doing several variations on the one theme, and as a tapestry is a time investment, I thought the smaller, the better. I also have a soft spot for little things.

I warped my Sampleit loom with Ashford tapestry cotton, which is my go to tapestry warp. I used a 7.5 dent reed because that is the only size I have for the Sampleit, but a 10 - 12.5 dent reed would be preferable.

Each tapestry measures approximately 3.5" X 4".


 Tapestry 1 was woven with scraps from my stash bag. My very messy, tangly stash bag! It has smaller pieces or balls of all sorts of yarns from past projects, but mostly fingering to worsted weight.
Incorporated into this piece are pieces of wool, cotton, bamboo, silk, alpaca and some unidentified freebie from long ago.


For Tapestry 2 I was going for a "twilight" look, so I chose a limited colour palette of greens, blues, greys and muted colours.


Tapestry 3 was woven entirely with 8/2 size weaving thread in cotton and cottolin. I also chose a muted colour palette for this one.
It ended up being my favourite of the three, I like the look of the finer yarn and details. It took a good deal longer to weave due to the thin yarn, but it was so relaxing, I didn't mind at all!

I plan to do a couple more little tapestries on this warp, but they will have to wait until I have a bit more time.


*This is an affiliate link, which means that if you click this link and buy the book, I will receive a small commission. I only recommend books I have actually read and love.

A book that really helped me get started with tapestry is Tapestry Weaving by Kirsten Glasbrook. It is not a highly detailed book, which I think makes it great for beginners. She shows the basic techniques, gives projects for you to try and then later there are examples of her own work in a gallery. I have had this book for years and still refer back to it for information and inspiration.


I also have an Introduction to Tapestry online class, which is currently only available to members and is a great place to start out.

Also, in this Youtube video, I discuss why tapestry can be done on a rigid heddle loom, but why it's not entirely ideal. 

I hope you enjoyed this post, Happy Weaving!


New Krokbragd Bag Class!


My brand new class is finished and available! When designing this bag, my plan was bold colour and design. I think I can safely say that I achieved that!


I used a contrast of deep, navy blue and a middle panel of bright colours and bold patterning to really set off the feature panel.


Originally I had a totally different design, but when I started weaving, found that it was a little more drab on the loom than it had been in my head. So, I whipped out the Sampleit, threw on a short warp and started experimenting with the colour palette I had chosen for the bag.


I was much happier with what I came up with on the small loom and although not all of this design made it into the bag class, I'm really happy with the finished bag - plus I have plenty of other designs up my sleeve for another time.


The idea for the bag actually came to my last year, when I was playing around with this sample below. It's not until recently that I actually got around to making the class.


The project uses two heddles and provides two different methods for threading, according to your preference. Full sewing and finishing instructions are also included in the class.

The bag pairs perfectly with my Krokbragd Mug Rug Weave Along that ran recently, so definitely start with the mug rugs if you're hesitant about giving this a go.

And, if you just want to find out more about Krokbragd, I have written this post which gives you more information, plus links to my Youtube videos on the topic.

I hope you can join me for this one, Krokbragd is so much fun, so rewarding and for me, is a weave with a total WOW factor!


Great rigid heddle weaving books!

My last post detailed some of my favourite books for 4 shafts or more, but today I'd like to talk about some great rigid heddle books.
I already have a video on this topic, but I know some people prefer to read rather than watch, plus I've added some extra books to the original list, so here we go!


*this post contains affiliate links. This means that if you click on the book link provided and purchase the book, I will receive a small commission.

I'll start with my favourite and most used book, in fact, this is the first rigid heddle weaving book I bought.

The Weaver's Idea Book by Jane Patrick This book has so much content and is great for beginners. It allows you to start with the basics and build as you go. Just about everything you need to know initially is contained within these pages and I think of it a little like a training ground for new weavers. It is also hardcover with spiral binding, making it easy to lay flat and view while you're weaving. Highly recommended!

Weaving made Easy by Liz Gipson. A lovely little book that includes information on loom set up. The projects are simple enough for beginners and interesting enough for all weavers.

Woven to Wear by Marilyn Murphy. I also read this book as a newer weaver and loved how it stirred my imagination. It contains simple garments with lots of plain weave, making it great for beginners, particularly those wanting to get a taste for sewing with your handwoven. The sewing projects are simple rather than finicky, with the use of large shapes instead of small pieces.

Inventive Weaving on a Little Loom by Syne Mitchell This book is awesome value for beginners to intermediate with lots of ideas. For the newer weaver, there is practical information and plenty of inspiration for once you have the basics down. I think of this book as one that you may not fully appreciate until you have some more weaving experience, perhaps a book that will grow with you through your weaving journey. Towards the middle and later part of the book are projects and ideas that may be too challenging for a new weaver, but that an enthusiastic and curious weaver will definitely want to make use of later on. There is a lot of information, it is attractively set out and a joy to flip through.

Weave, Knit, Wear by Judith Shangold  This book is responsible for opening my eyes and quickening my heart over the range of possibilities with a rigid heddle loom and garment making. Judith uses mostly plain weave, colour and design to make fabric look special. She includes design layouts and illustrations to help you wrap your head around how garments can be constructed. What I really love about this book is the fusion of weaving, knitting and crochet added in. It really has encouraged me to think outside the square and maximise my rigid heddle loom.

Simple Woven Garments by Sara Goldberg Another really great book on making simple garments with simple, colourful, hand woven cloth. There are more than 20 projects and they are all wearable! There are also details on adjusting garments to your own specifications.

I hope you enjoyed my list and until next time...

Happy Weaving!

Weave Along Round Up

The Krokbragd Mug Rug Weave Along (try saying that with a mouthful of cake!) has been a great success! While many students are still working on their mug rugs and some have yet to start, I have been seeing so many wonderful photos of their work, that I couldn't wait to share.

What I really love is the variety of mug rugs I'm seeing and the range of interpretations of my original design.


Charlotte, who has been with me a long time, and is a very prolific weaver, came up with several variations on the original design. She even figured out how to weave sheep and then shared the draft with the other students, several of whom were inspired to weave their own sheep!


Mary went with some darker colours and white highlights. So lovely!


This is one of Kelly's (a different Kelly!) interpretations. I love that she included many different colours, but that they all work together so harmoniously.


And another, different rug from Kelly. You can see Charlotte's sheep and my tulips (from this Youtube tutorial).


And finally, these beauties from Connie. So lovely!


Robyn decided on a bold and traditional design for this mug rug. Love the colours!

Perhaps you're looking at all these gorgeous mug rugs and wishing you had joined in? No problem, you still can! 
All the details are here.

Thanks to everyone who joined in and threw themselves into the challenge with such gusto, it has been so exciting for me to see.

This weave along leads beautifully into the next class, which will be a krokbragd bag with two heddles. I'm working on that right now, it should be ready in a couple of weeks.

Until next time....

Happy Weaving!


Krokbragd Weave Along coming soon!


Have you heard the news? I am currently working on an exciting weave along! The project is Krokbragd Mug Rugs for rigid heddle loom and I feel like a pig in mud (if you know me at all, you will know how I love krokbragd!)


Because I like to accommodate for weavers of all levels, the weave along will include two methods for weaving the mug rugs. One class will be for those who want to use one heddle, a heddle rod and a pick up stick. Class two will be for those who want to use two heddles. The finished mug rugs will be just the same, but the different methods will give you choices about how to weave them.


The mug rugs are minimal on the yarn, you only need small amounts and limited colours. Because of the interesting designs, you get something pretty awesome looking for a small investment. If you are interested in reading more about Krokbragd, I have written another blog post on this beautiful weave structure. 


This weave along will be for members only. To become a monthly member, visit this link, or to become a yearly member, go here.


Once you are a member, you have access to the Member's Community group on Facebook. 

The best way to stay updated is to join my email list.

A full materials list will be available prior to the commencement of the weave along to give everyone the best chance of starting together.

I'm hoping to commence the weave along early to mid August.

I really hope you can join me for this one, it's going to be so much fun!


Kelly's hand woven, perfectly hemmed technique.


I won't tell you how long these towels have been sitting on my creative table waiting to be hemmed. What is it with final techniques and me? I go to all that trouble to weave something beautiful and then let it sit there for who knows how long before I get around to hemming!  Anyway, lets focus on the positives. The towels ARE hemmed now, and I'm going to share my simple but effective hemming techniques with you!


Firstly, always weave a little extra where you intend to hem, and don't forget to factor in hemming allowances to your overall calculations. I like to make a little contrast weave at the beginning and end of a piece that I'm going to hem. Here I've woven plain weave borders at either end. There are 2 advantage to this - 
1. The contrast looks nice.
2. The border is less bulky and therefore makes a more crisp and pleasing hem.
You can see that my raw edge is secured on a serger to prevent any unravelling during the wet finishing process. It is helpful to give the whole woven piece a good press before beginning, it's always easier to work with pressed fabric.


This is what I call my "dog ear" technique.  Fold in a corner on each side of the hem and press down with an iron. There are 2 reasons for this also - 
1. The corners can get ugly and a bit ragged in the washing process - I want to hide them!
2. Towels have a tendency to be wider at each end. This reduces a little of that "flaired out" look.


Once my dog ears are pressed down neatly, I take the raw edge and fold it over, usually around 1/4" but more if it's particularly raggy. Press with the iron.


Now I fold again, this time 1/2" or more and press. Now all raw edges and corners should be completely encased and hidden. Once pressed, you can also place pins along to hold everything in place if you wish.


Take it to the sewing machine (different towel in this photo but the same process). Sew with a straight, medium stitch close to the folded edge (roughly 1/4 - 1/8"). You can use a different stitch if you want to, I just like the professional looking finish a medium straight stitch gives. Don't forget to reverse stitch at the start and finish.
For an almost invisible finish, you can hand hem with a needle and thread, perhaps I will go over that another time.

Seeing as we're on the subject of towels, if you're on the hunt for your next towel project, you may want to try one of my classes or patterns.


Online class:

PDF Patterns:


Drop me a comment to let me know if this post has been helpful to you, I love feedback!

Until next time...

Happy Weaving!


I have a rigid heddle loom, why would I consider buying a floor loom?

I was asked this question in one of my Facebook groups. I started to type a response, then decided it would be better answered in a blog post as it's not a simple question!

It is true that the Rigid Heddle Loom is capable of a lot (even an 8 shaft pattern if you really want to) but there are many reasons why I love to have both a RHL and a floor loom. 


I wrote a series recently that compared different types of looms that you may wish to review:

The Rigid Heddle Loom

The Table Loom

The Floor Loom

Now, I said the rigid heddle loom is capable of weaving 8 shafts, but does that mean that I would actually want to? To achieve that would mean multiple heddles, multiple pick up sticks and a pretty painstaking process that would have me leaping on to my floor loom in no time. Because the floor loom is made for this, it's set up for more complex weaves, that is it's job. So, while the RHL can be utilised for more complex weaves, that doesn't mean that it's the ideal choice.


Next, the RHL has yarn size limitations. The smallest dent heddle currently available is a 15 dent by Ashford. Yes, you can still double threads or use extra heddles to increase the available sett, but that is another difference to a floor loom and a consideration if you like to weave with fine threads.

Finally, the floor loom is a full body experience. That sounds a bit weird and new age doesn't it?! But what I mean is that you are using your head (eyes to read the pattern as you weave, if you need to), your hands to throw and catch the shuttle (your body naturally sways slightly from side to side as you get into the rhythm) and your legs (as your feet move or "walk" the treadles to operate the shafts). It's actually a bit of a workout!

Because of this "full body" approach on a floor loom, you are able to operate many actions at once. And that is the real beauty of floor loom weaving, the harmony of actions that allow you to work fast to achieve sometimes quite amazing results.

Don't forget that there are pros and cons to all types of weaving and I try not to promote one over the other because I believe each weaver needs to find the right fit for their particular needs. If it seems that I am promoting the floor loom in this article, it is only within context of answering a question.

To recap, why would I buy a floor loom? 
1. Intricacy of pattern
2. Finer threads
3. Speed and efficiency

I hope this article helps you, thank you for reading!

Make do and make a start

This post contains affiliate links. I only recommend products I use and love.
I thought I'd share with you a little reality check today. It is easy for us to imagine that people we see on social media, on websites, on Youtube or anywhere on the internet have it all together and their lives are pretty perfect. We imagine them to have all the things we need or that they are somehow "better" than we are - all because they have learned how to present themselves in a certain way that looks great to the rest of the world.

How does this tie in to weaving? In so many ways! How often have you wished that your loom was bigger or better? Have you gazed longingly at other weaver's beautiful pictures online and wished that you could do that too? Have you grumbled at your lack of space/time/finances to "make it all happen". 

Well, I'm here to tell you that, just like life, weaving is a journey - often long and sometimes difficult. 
When people find out that I homeschool my children and have been doing so for their entire lives, they are amazed and say things like "Well, you are an expert then!" Nothing could be further from the truth. Every day is a new start with people and needs ever changing. It's a constant process of re-evaluation and starting over. Of asking God to please help me through this day. Of learning and applying new things. 

And I think this is normal. We don't step on a plane expecting to arrive at our destination immediately. We have to be patient to get the reward!

To illustrate my point, I will show you my film studio from today.  Much of the time, I can't film in my studio space as it's a shared, walk through room.


So, I set up in our bedroom so that I could close the door. It's a bit dingy and it desperately needs a paint job, but it's a room with a door, so I'll take it.  Lets have a look at my setup.


I film with my son's Nikon D7100 and his Video MicPro microphone. The tripod is mine! The loom is mine too :D The chair was a freebie that my husband got for me when his old office building was closing down. The OttLite belongs to my husband. When I finish the video, I edit on my son's computer using his software. 

You can see that most of what I use to film videos for my Online Weaving School is borrowed and fairly basic. But, it all allows me to do what I do. I may never have a great setup, no matter how much I want it, and that is ok, I am grateful to be able to do what I do without the bells and whistles. 

I can polish my photos and videos so that they look pretty good on your computer. I get to work from home, doing what I love and spending the days with my children. Does this mean I have the perfect life? No way, it just means that I'm prepared to make do and make a start.


Today I was working on filming for my up and coming Boot Camp for Weavers course. I'm beyond excited about this, a little apprehensive, having never done something like this, but very excited. It gives me so much joy to see a new weaver get up and weaving with enthusiasm and confidence, that is what I want for all my students! There will be more information about the course as I near completion. 
How did this blog post get so long? My fingers seemed to have a mind of their own and if I don't finish up my family will be eating burned chicken tonight! If you got this far, thank you for taking the time to read.

Until next time....

Happy Weaving!

This blog is closing!

All posts will now be found at my new site.  Click here to go the the new site.